Additional system features
Using the register list

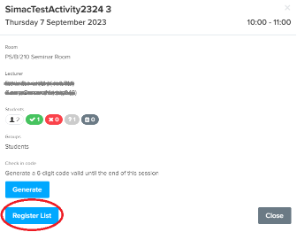
You can access the register list by selecting the Register List button in the code generation pop-up box. In this list, you will see:
- Which students are timetabled for that session
- How many students have checked in
- How many students have not yet checked in
Activating the register list
In order for you to manually edit the register list you must activate it by clicking the Start button, otherwise it will stay as read-only. Students can still check-in themselves without the list being activated.

Manually registering students
You can manually register a student if they are not able to register themselves (eg they do not have access to a device).
Once you open the activated register list, click once on the relevant student profile to check them in and click twice to mark them as absent.
Marking students as absent is not required as the system will automatically mark any student without a green tick (present mark) as absent when the event ends.

![]()
A small smartphone icon will appear in the top left corner of the student profile image for those students who have checked themselves into the session using the Check-In code.
Adding or removing an additional student
Occasionally a student may attend an event they are not timetabled for. To add a student on an ad-hoc basis to an event, select Add Student in the activated register list and search for the student. Once you've added them, they will be able to check in with the code as normal, or you can manually mark them as present.

If a student is swapping from one event to another, you will need to add them to the new session and remove them from the original event too otherwise it may affect their attendance percentage.

To do this, you can search for the student’s original activity in the same way you would search for another member of staff. Once you've found the student in the activated register list for the old activity, click the three dots on their profile to the right of their name and select Remove.
These three dots will only be active once the event has started so it may be easier to do this task after the event has taken place.
Searching for another member of staff

To open the navigation menu, select the three lines icon in the top left next to the University logo. In this menu, you will see a profile icon followed by your email address and four options: My Timetable, Timetables, Absences and Reports.
To search for another member of staff, choose the Timetables option and enter the relevant name.
Once you've selected the correct name, you can add their timetable to generate a Check-In code or access the register list as normal. This is ideal if you are covering for a colleague or taking a session as a Graduate Teaching Assistant.
Co-located events
A co-located activity in Check-In is classified as any event which happens at the same time, in the same room, with the same member(s) of staff assigned. If a co-location is identified by Check-In, only one code will need to be generated and the system will automatically assign this to all of the ‘duplicate’ instances of the event.

Example of co-located activities from 3-4pm
To generate a code for these co-located sessions, open one of the events in the Check-In timetable and generate the code as normal. You only need to do this on the first event as the system will automatically put the same code on all of the ‘duplicate’ events for you. You’ll notice the same Check-In code on the other events if you click into those too.
The register list will have different students on each ‘duplicate’ event activity, so if you want to manually check in a student or look at the register, you will need to open each individual event to find the right one.
Students will not have any knowledge of this way of timetabling events. From a student perspective, they will all see the same screen and use the same code as each other, regardless of which event they are actually scheduled to.
This is not the case if the event happens in different rooms. For these events please read our specific guidance where we advise you to record attendance on paper or manually check in students, if you have time. We’re looking at ways to bring these types of events into Check-In in future phases.
Download our plain-text printable version of these features:
